UPDATE: Newest kernels require you to add the GPIO-Information directly into the config.txt, otherwise the LIRC won’t be available:
Append this to your /boot/config.txt (if you attach the IR receiver to GPIO 23 as stated in the article below):
dtoverlay=lirc-rpi,gpio_in_pin=23
I attached a Raspberry PI (Model B) via HDMI to my LG 42LH9000, a 42″ LED-TV from 2009. With the newest version of OpenELEC 4.0.0, I was suprised to find out that the most commands via CEC work out nicely. The only trouble I had was, that the „Back“ and „Exit“-Buttons didn’t work at all. Instead, I had to press „STOP“ and „OK“ directly after each other in a short time for „Back“ and „STOP“ and „PAUSE“ for an „Exit“.
As I was using an IR remote control anyways, I thought the raspberry could receive the data for the two missing buttons directly. At first, I needed an IR receiver diode. That was easy, as I still had an old, broken mini-helicopter which was steered using IR. As the helicopter itself was useless, I desoldered the IR receiver. I couldn’t make out a model number, so I simply guessed.
Facing the side with the receiver (that’s the side with the little bump), you can see three legs coming out of it. The left one I used for „DATA“, the middle one for „GND“ and the right one for „Vs“. As the helicopter was working with a lithium battery, I simply guessed that the receiver will work out nicely with only 3.3V.
Next step was wiring the receiver to the Raspberry PI. I needed +3.3V, GND and a useful GPIO-pin. Searching the web, I found this great view of the GPIOs. I’m sorry that I can’t give any credit to the one who created this graphic, as there are no copyright notices anywhere to find.
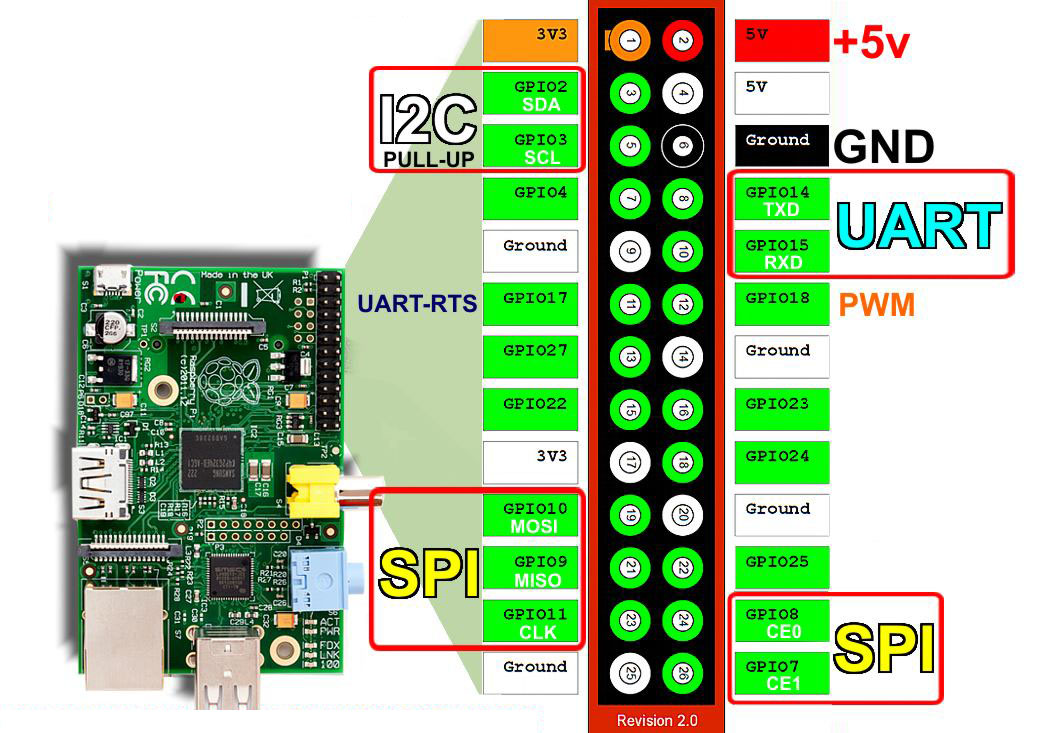
I attached the left („DATA“)-leg to GPIO 23, the middle leg to GND and the right leg („Vs“) to +3.3V.
After logging into my Raspberry PI, which was already running OpenELEC, I tried these commands to test if the IR receiver was working:
modprobe lirc_rpi gpio_in_pin=23 debug=1
dmesg
The dmesg should return something like this:
[118254.914704] lirc_dev: IR Remote Control driver registered, major 248
[118254.915686] lirc_rpi: module is from the staging directory, the quality is unknown, you have been warned.
[118254.939532] lirc_rpi: is_right_chip bcm2708_gpio 0
[118254.939904] lirc_rpi: to_irq 193
[118255.831302] lirc_rpi: auto-detected active low receiver on GPIO pin 23
[118255.831921] lirc_rpi lirc_rpi.0: lirc_dev: driver lirc_rpi registered at minor = 0
[118255.831946] lirc_rpi: driver registered!
Now we want to make sure that the receiver is actually working. Grap your remote control, run this command and see if anything happens on the console.
mode2 -d /dev/lirc0
This is my example output when I hit the „BACK“-Button on my remote control:
space 2189447
pulse 9022
space 4473
pulse 571
space 611
pulse 520
space 567
pulse 584
space 1658
pulse 588
space 541
pulse 588
space 552
pulse 590
space 542
pulse 587
space 541
pulse 568
space 571
pulse 585
space 1659
pulse 586
space 1696
pulse 544
space 547
pulse 562
The IR receiver actually works and we just saw the RAW input from the sensor!
To make sure that the next time the Raspberry PI is started, that the module is loaded correctly, type in this command:
echo "options lirc_rpi gpio_in_pin=23" >/storage/.config/modprobe.d/lirc_rpi.conf
Make sure that no LIRCD is running:
killall lircdAnd start recording the input from the two buttons:
mkdir -p ~/work/lirc
cd ~/work/lirc
irrecord -d /dev/lirc0 inputlg
The last command guides you through a wizard, the two buttons are called BTN_BACK and KEY_EXIT. I added the RED button as well and mapped it to KEY_C, as this is the context menu for the KODI.
As a result, you should have a file inputlg with these contents:
# Please make this file available to others
# by sending it to <lirc@bartelmus.de>
#
# this config file was automatically generated
# using lirc-0.9.1-git(default) on Sun May 11 22:47:19 2014
#
# contributed by
#
# brand:                       inputlg.conf
# model no. of remote control:
# devices being controlled by this remote:
#

begin remote

  name  inputlg.conf
  bits           16
  flags SPACE_ENC|CONST_LENGTH
  eps            30
  aeps          100

  header       9006  4492
  one           565  1677
  zero          565   566
  ptrail        562
  repeat       9008  2246
  pre_data_bits   16
  pre_data       0x20DF
  gap          108236
  toggle_bit_mask 0x0

      begin codes
          KEY_EXIT                 0x14EB
          KEY_MENU                 0xDA25
          KEY_C                    0x4EB1
      end codes

end remote
As you can see I really only added the two buttons that I still needed. If you want to add any more buttons, you must know the correct names for them. These can be retrieved with a simple command. As there are MANY possible buttons available, I limit the output to those which might be useful for me. The following command for example shows me the „EXIT“-Button:
irrecord --list-namespace | grep -i exit
I assigend my „BACK“-Button from the remote to „KEY_EXIT“, as this works like a „back-button“ within KODI. The „EXIT“-Button from my remote is used as a „MENU“ key.
If you want to know which buttons are used by KODI (and in what manner), the answers lie inside the file /usr/share/kodi/system/Lircmap.xml with the section
Now copy the file to the correct location:
cp inputlg /storage/.config/lircd.conf
And reboot:
sync
reboot
If you want to add other keys, which are normally not part of the remote control, here are the steps to work it our correctly:
Make sure that you have the Lircmap.xml from the system in your storage:
cp /usr/share/kodi/system/Lircmap.xml /storage/.kodi/userdata/Lircmap.xml
And add in the last section which starts with <remote device="devinput"> the following information:
KEY_C
Here are the links that helped me set this up:
http://wiki.openelec.tv/index.php?title=Guide_To_lirc_rpi_GPIO_Receiver
http://wiki.openelec.tv/index.php?title=Guide_To_Test_a_Remote_and_Remap_Keys